ExtJs2.0学习系列(8)--Ext.FormPanel之第五式(综合篇)
本文共 6415 字,大约阅读时间需要 21 分钟。
在和前面的介绍中,我们基本上对form表单中常见组件有了简单的认识,今天我们做个综合点的例子,向服务器提交下!
其实这篇文章很简单,没有什么发光点,暂放首页半天,忘各位理解!
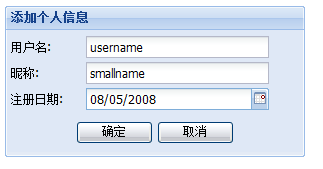
先来个简单的例子,以说明formpanel如何把数据传给其他页面。
效果图:

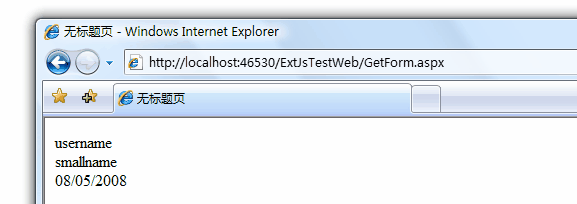
现在我们要实现的效果是:点击确定,把值传到另一页面!,如下:

原页面js代码为:
Ext.onReady( function (){
Ext.QuickTips.init();
var form = new Ext.FormPanel({
frame: true ,
width: 300 ,
// monitorValid:true,//绑定验证
layout: " form " ,
labelWidth: 70 ,
title: " 添加个人信息 " ,
labelAlign: " left " ,
renderTo:Ext.getBody(),
submit: function (){
this .getEl().dom.action = ' GetForm.aspx ' ,
this .getEl().dom.method = ' POST ' ,
this .getEl().dom.submit();
},
items:[{
xtype: " textfield " ,
fieldLabel: " 用户名 " ,
// id:"UserName",
allowBlank: false ,
blankText: " 不能为空,请正确填写 " ,
name: " UserName " ,
anchor: " 90% "
},{
xtype: " textfield " ,
fieldLabel: " 昵称 " ,
// id:"SmallName",
name: " SmallName " ,
anchor: " 90% "
},{
xtype: " datefield " ,
fieldLabel: " 注册日期 " ,
// id:"RegDate",
name: " RegDate " ,
anchor: " 90% "
}],
});
接受页面GetForm.aspx的cs代码为: Ext.QuickTips.init();
var form = new Ext.FormPanel({
frame: true ,
width: 300 ,
// monitorValid:true,//绑定验证
layout: " form " ,
labelWidth: 70 ,
title: " 添加个人信息 " ,
labelAlign: " left " ,
renderTo:Ext.getBody(),
submit: function (){
this .getEl().dom.action = ' GetForm.aspx ' ,
this .getEl().dom.method = ' POST ' ,
this .getEl().dom.submit();
},
items:[{
xtype: " textfield " ,
fieldLabel: " 用户名 " ,
// id:"UserName",
allowBlank: false ,
blankText: " 不能为空,请正确填写 " ,
name: " UserName " ,
anchor: " 90% "
},{
xtype: " textfield " ,
fieldLabel: " 昵称 " ,
// id:"SmallName",
name: " SmallName " ,
anchor: " 90% "
},{
xtype: " datefield " ,
fieldLabel: " 注册日期 " ,
// id:"RegDate",
name: " RegDate " ,
anchor: " 90% "
}],
});
protected void Page_Load( object sender, EventArgs e)
{
string UserName = Request.Form[ " UserName " ];
string SmallName = Request.Form[ " SmallName " ];
string RegDate = Request.Form[ " RegDate " ];
Response.Write(UserName + " <br/> " + SmallName + " <br/> " + RegDate);
}
因为很简单,我做个简要说明: {
string UserName = Request.Form[ " UserName " ];
string SmallName = Request.Form[ " SmallName " ];
string RegDate = Request.Form[ " RegDate " ];
Response.Write(UserName + " <br/> " + SmallName + " <br/> " + RegDate);
}
// 几点说明
1 .首先定义submit参数的执行函数,即:
submit: function (){
this .getEl().dom.action = ' GetForm.aspx ' , // 转向页面地址
this .getEl().dom.method = ' POST ' , // 方式
this .getEl().dom.submit(); // 提交!
},
2 .为按钮添加触发相应的提交(取消)事件(这样就不是默认的ajax提交):
buttons:[{text: " 确定 " ,handler:login,formBind: true },{text: " 取消 " ,handler:reset}]
});
function login(){
form.form.submit(); // 提交
}
function reset(){
form.form.reset(); // 取消
}
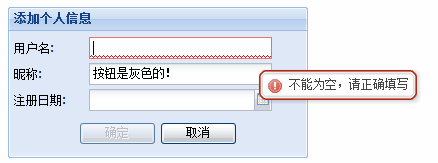
3 .如果你想绑定验证,在form表单添加参数monitorValid: true ,然后在按钮配置参数中添加formBind: true ,如
buttons:[{text: " 确定 " ,handler:login,formBind: true },{text: " 取消 " ,handler:reset}]
则只有所有的填写字段都满足条件时, " 确定 " 方可提交!如下图,

好了,一个简单的formpanel的提交的原理弄清楚啦!
有关form提交数据的方法有多种,大家可以参考(三种ext提交数据的方式),
以后有机会我们再讨论!
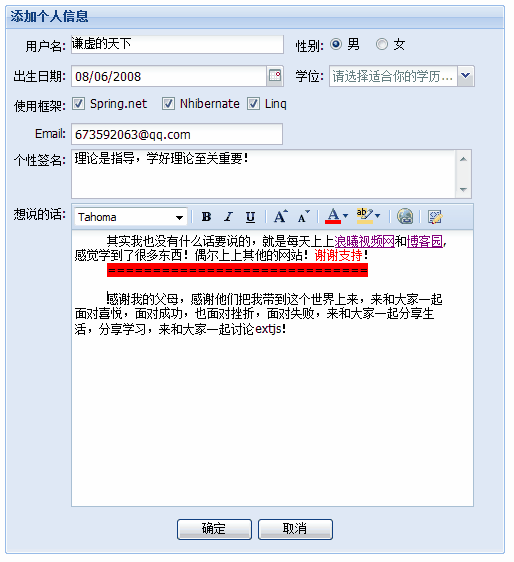
下面我们来做个复杂点(只是样子)的form,示例一下(还是上面的原理)!
效果图:


不过在传过来的页面要记得ValidateRequest="false",安全编码我就暂且不讨论了!
js代码:
Ext.onReady( function (){
Ext.QuickTips.init();
var form = new Ext.FormPanel({
frame: true ,
width: 500 ,
monitorValid: true , // 把有formBind:true的按钮和验证绑定
layout: " form " ,
labelWidth: 55 ,
title: " 添加个人信息 " ,
labelAlign: " right " ,
renderTo:Ext.getBody(),
submit: function (){
this .getEl().dom.action = ' GetForm.aspx ' ,
this .getEl().dom.method = ' POST ' ,
this .getEl().dom.submit();
},
items:[{
xtype: " panel " ,
layout: " column " ,
fieldLabel: " 用户名 " ,
isFormField: true ,
items:[{
columnWidth:. 5 ,
xtype: " textfield " ,
allowBlank: false ,
blankText: " 不能为空,请填写 " ,
name: " UserName " ,
anchor: " 90% "
},{
columnWidth:. 20 ,
layout: " form " ,
labelWidth: 40 ,
labelAlign: " right " ,
items:[{
xtype: " radio " ,
fieldLabel: " 性别 " ,
boxLabel: " 男 " ,
name: " Sex " ,
checked: true ,
inputValue: " man " , // 这里如果用value,值是on,所以用inputValue(出现这种情况的是radio,checkbox)
anchor: " 95% "
}]
},{
columnWidth:. 30 ,
layout: " form " ,
labelWidth: 1 , // 让标签宽度为很小的值(奇怪的是为0时反而不行)
items:[{
xtype: " radio " ,
boxLabel: " 女 " ,
labelSeparator: "" , // 去除分隔符“:”
name: " Sex " ,
inputValue: " woman " ,
anchor: " 95% "
}]
}]
},{ // 上面是第一行
xtype: " panel " ,
layout: " column " ,
fieldLabel: " 出生日期 " ,
isFormField: true ,
items:[{
columnWidth:. 5 ,
xtype: " datefield " ,
name: " BirthDate " ,
anchor: " 90% "
},{
columnWidth:. 5 ,
layout: " form " ,
labelWidth: 40 , // 注意,这个参数在这里可以调整简单fieldLabel的布局位置
items:[{
xtype: " combo " ,
name: " Degree " ,
fieldLabel: " 学位 " ,
store:[ " 小学 " , " 初中 " , " 高中 " , " 专科 " , " 本科 " , " 硕士 " , " 博士 " ],
emptyText: " 请选择适合你的学历 " ,
" ,
anchor: " 90% "
}]
}]
},{ // 上面是第二行
xtype: " panel " ,
layout: " column " ,
isFormField: true ,
fieldLabel: " 使用框架 " ,
items:[{
columnWidth:. 2 ,
xtype: " checkbox " ,
boxLabel: " Spring.net " ,
name: " SpringNet " ,
inputValue: " spring " // 这里如果用value,值是on,所以用inputValue
},{
columnWidth:. 2 ,
layout: " form " ,
labelWidth: 1 ,
items:[{
xtype: " checkbox " ,
boxLabel: " Nhibernate " ,
labelSeparator: "" ,
name: " NHibernate " ,
inputValue: " nhibernate " ,
anchor: " 95% "
}]
},{
columnWidth:. 6 ,
layout: " form " ,
labelWidth: 1 ,
items:[{
xtype: " checkbox " ,
boxLabel: " Linq " ,
labelSeparator: "" ,
name: " Linq " ,
inputValue: " linq " ,
anchor: " 95% "
}]
}]
},{ // 上面是第三行
xtype: " textfield " ,
fieldLabel: " Email " ,
name: " Email " ,
vtype: " email " , // email验证,如果想自定义验证的话,请参见前面的文章
vtypeText: " email格式错误! " ,
anchor: " 56% " // 控制文本框的长度
},{ // 上面是第四行
xtype: " textarea " ,
fieldLabel: " 个性签名 " ,
name: " OneWord " ,
height: 50 ,
anchor: " 95% "
},{ // 上面是第五行
xtype: " htmleditor " ,
fieldLabel: " 想说的话 " ,
name: " WantToSay " ,
anchor: " 95% " ,
enableAlignments: false , // 去除左右对齐工具栏
enableLists: false // 去除列表工具栏
}],
buttons:[{text: " 确定 " ,handler:login,formBind: true },{text: " 取消 " ,handler:reset}]
});
function login(){
form.form.submit();
}
function reset(){
form.form.reset();
}
});
Ext.QuickTips.init();
var form = new Ext.FormPanel({
frame: true ,
width: 500 ,
monitorValid: true , // 把有formBind:true的按钮和验证绑定
layout: " form " ,
labelWidth: 55 ,
title: " 添加个人信息 " ,
labelAlign: " right " ,
renderTo:Ext.getBody(),
submit: function (){
this .getEl().dom.action = ' GetForm.aspx ' ,
this .getEl().dom.method = ' POST ' ,
this .getEl().dom.submit();
},
items:[{
xtype: " panel " ,
layout: " column " ,
fieldLabel: " 用户名 " ,
isFormField: true ,
items:[{
columnWidth:. 5 ,
xtype: " textfield " ,
allowBlank: false ,
blankText: " 不能为空,请填写 " ,
name: " UserName " ,
anchor: " 90% "
},{
columnWidth:. 20 ,
layout: " form " ,
labelWidth: 40 ,
labelAlign: " right " ,
items:[{
xtype: " radio " ,
fieldLabel: " 性别 " ,
boxLabel: " 男 " ,
name: " Sex " ,
checked: true ,
inputValue: " man " , // 这里如果用value,值是on,所以用inputValue(出现这种情况的是radio,checkbox)
anchor: " 95% "
}]
},{
columnWidth:. 30 ,
layout: " form " ,
labelWidth: 1 , // 让标签宽度为很小的值(奇怪的是为0时反而不行)
items:[{
xtype: " radio " ,
boxLabel: " 女 " ,
labelSeparator: "" , // 去除分隔符“:”
name: " Sex " ,
inputValue: " woman " ,
anchor: " 95% "
}]
}]
},{ // 上面是第一行
xtype: " panel " ,
layout: " column " ,
fieldLabel: " 出生日期 " ,
isFormField: true ,
items:[{
columnWidth:. 5 ,
xtype: " datefield " ,
name: " BirthDate " ,
anchor: " 90% "
},{
columnWidth:. 5 ,
layout: " form " ,
labelWidth: 40 , // 注意,这个参数在这里可以调整简单fieldLabel的布局位置
items:[{
xtype: " combo " ,
name: " Degree " ,
fieldLabel: " 学位 " ,
store:[ " 小学 " , " 初中 " , " 高中 " , " 专科 " , " 本科 " , " 硕士 " , " 博士 " ],
emptyText: " 请选择适合你的学历
 " ,
" ,anchor: " 90% "
}]
}]
},{ // 上面是第二行
xtype: " panel " ,
layout: " column " ,
isFormField: true ,
fieldLabel: " 使用框架 " ,
items:[{
columnWidth:. 2 ,
xtype: " checkbox " ,
boxLabel: " Spring.net " ,
name: " SpringNet " ,
inputValue: " spring " // 这里如果用value,值是on,所以用inputValue
},{
columnWidth:. 2 ,
layout: " form " ,
labelWidth: 1 ,
items:[{
xtype: " checkbox " ,
boxLabel: " Nhibernate " ,
labelSeparator: "" ,
name: " NHibernate " ,
inputValue: " nhibernate " ,
anchor: " 95% "
}]
},{
columnWidth:. 6 ,
layout: " form " ,
labelWidth: 1 ,
items:[{
xtype: " checkbox " ,
boxLabel: " Linq " ,
labelSeparator: "" ,
name: " Linq " ,
inputValue: " linq " ,
anchor: " 95% "
}]
}]
},{ // 上面是第三行
xtype: " textfield " ,
fieldLabel: " Email " ,
name: " Email " ,
vtype: " email " , // email验证,如果想自定义验证的话,请参见前面的文章
vtypeText: " email格式错误! " ,
anchor: " 56% " // 控制文本框的长度
},{ // 上面是第四行
xtype: " textarea " ,
fieldLabel: " 个性签名 " ,
name: " OneWord " ,
height: 50 ,
anchor: " 95% "
},{ // 上面是第五行
xtype: " htmleditor " ,
fieldLabel: " 想说的话 " ,
name: " WantToSay " ,
anchor: " 95% " ,
enableAlignments: false , // 去除左右对齐工具栏
enableLists: false // 去除列表工具栏
}],
buttons:[{text: " 确定 " ,handler:login,formBind: true },{text: " 取消 " ,handler:reset}]
});
function login(){
form.form.submit();
}
function reset(){
form.form.reset();
}
});
接受cs页面的代码:
protected void Page_Load( object sender, EventArgs e)
{
string UserName = Request.Form[ " UserName " ];
string Sex = Request.Form[ " Sex " ];
string BirthDate = Request.Form[ " BirthDate " ];
string Degree = Request.Form[ " Degree " ];
string SpringNet = Request.Form[ " SpringNet " ];
string NHibernate = Request.Form[ " NHibernate " ];
string Linq = Request.Form[ " Linq " ];
string Email = Request.Form[ " Email " ];
string OneWord = Request.Form[ " OneWord " ];
string WantToSay = Request.Form[ " WantToSay " ];
Response.Write( " 用户名: " + UserName + " <br/> " );
Response.Write( " 性别是: " + Sex + " <br/> " );
Response.Write( " 出生日期: " + BirthDate + " <br/> " );
Response.Write( " 学位: " + Degree + " <br/> " );
Response.Write( " 使用框架有: " );
if (SpringNet != null )
{
Response.Write(SpringNet + " , " );
}
if (NHibernate != null )
{
Response.Write(NHibernate + " , " );
}
if (Linq != null )
{
Response.Write(Linq + " , " );
}
Response.Write( " <br/> " );
Response.Write( " 邮件地址: " + Email);
Response.Write( " 个性签名: " + OneWord + " <br/> " );
Response.Write( " 想说的话: " + WantToSay);
}
{
string UserName = Request.Form[ " UserName " ];
string Sex = Request.Form[ " Sex " ];
string BirthDate = Request.Form[ " BirthDate " ];
string Degree = Request.Form[ " Degree " ];
string SpringNet = Request.Form[ " SpringNet " ];
string NHibernate = Request.Form[ " NHibernate " ];
string Linq = Request.Form[ " Linq " ];
string Email = Request.Form[ " Email " ];
string OneWord = Request.Form[ " OneWord " ];
string WantToSay = Request.Form[ " WantToSay " ];
Response.Write( " 用户名: " + UserName + " <br/> " );
Response.Write( " 性别是: " + Sex + " <br/> " );
Response.Write( " 出生日期: " + BirthDate + " <br/> " );
Response.Write( " 学位: " + Degree + " <br/> " );
Response.Write( " 使用框架有: " );
if (SpringNet != null )
{
Response.Write(SpringNet + " , " );
}
if (NHibernate != null )
{
Response.Write(NHibernate + " , " );
}
if (Linq != null )
{
Response.Write(Linq + " , " );
}
Response.Write( " <br/> " );
Response.Write( " 邮件地址: " + Email);
Response.Write( " 个性签名: " + OneWord + " <br/> " );
Response.Write( " 想说的话: " + WantToSay);
}
经过一个简单的传值原理传值后,一个表单就可以把数据存储到数据库中去了!
// 注意几点
1 .绑定验证的两个参数 monitorValid: true ,formBind: true
2 .精确布局要注意的参数为和width有关的:width: 500 ,labelWidth: 55 ,columnWidth:. 5 ,anchor: " 90% " ,isFormField:true等
3 .radio和checkbox通过inputValue获取值,页面传值
4.多列多组件布局为form和column和form布局组合使用,请参考源码分析!
1 .绑定验证的两个参数 monitorValid: true ,formBind: true
2 .精确布局要注意的参数为和width有关的:width: 500 ,labelWidth: 55 ,columnWidth:. 5 ,anchor: " 90% " ,isFormField:true等
3 .radio和checkbox通过inputValue获取值,页面传值
4.多列多组件布局为form和column和form布局组合使用,请参考源码分析!
至此,formpanel的简单使用就告一段落,但是formpanel的应用还远远没有讲到,有机会我们再在高级篇里讨论!
谢谢各位朋友的支持!
在下篇中我们接着诉说另外一个组件tabpanel,希望各位支持,拍砖,给我动力!
最后,推荐一个网站:
js文件下载:
你可能感兴趣的文章
无线Mesh网络的优点总结
查看>>
浅谈原始套接字 SOCK_RAW 的内幕及其应用(port scan, packet sniffer, syn flood, icmp flood)
查看>>
要实现的软件
查看>>
对一名电子信息工程专业应届毕业生的建议 .
查看>>
linux block层的class diagram
查看>>
linux block IO open的顺序图
查看>>
linux block IO open的顺序图(二)
查看>>
emmc总结
查看>>
java平台概念
查看>>
qt 陷阱
查看>>
Qt 绑定本机的ip
查看>>
头文件多次包含编译出错
查看>>
ubuntu16.04用root用户登陆图形界面
查看>>
oss_hdaudio移植
查看>>
docker如何将运行中的容器保存为docker镜像?
查看>>
pytorch:测试GPU是否可用
查看>>
了解android四大组件
查看>>
静态编译、动态编译、静态链接库和动态链接库理解
查看>>
mjpg-streamer学习笔记7------输出通道
查看>>
android导入文件包详解
查看>>